ZapDoc is an AI-powered document processing platform that extracts structured data from PDF documents and delivers results in Excel format via email.
I didn’t start out wanting to build a document automation platform.
What I wanted was leverage. I’d seen firsthand how time-consuming and painful it was to pull structured data out of messy PDFs: invoices, CVs, contracts, proposals… all needing to be manually parsed, copy-pasted, or hand-entered into Excel.
So I asked myself: Could I build something that turns these documents into clean, structured spreadsheets, with zero effort from the user?
After a few weekends and sleepless nights, the answer became ZapDoc, a web tool that:
Takes multiple PDFs or a .zip archive,
Lets you define which fields you want to extract (e.g. “name”, “email”, “amount”, “date”),
And returns a clean Excel file by email.
It sounds simple, but the devil is in the details.
From MVP to modular system
I built the first prototype over a weekend: FastAPI for the backend, hosted on Railway; a minimal React frontend on Vercel; and OpenAI for field extraction.
v0: prove it works
The early version was rough, but functional.
The idea was to make it free, so people would actually use it and I’d get some feedback. It had to be friction-free.
I tested it with real CVs and invoices. I posted in indie Discords to get feedback, asking people what they’d actually use it for.
One thing became clear: I didn’t need to support every document type. I needed to be amazing at just a few — like resumes, invoices, and RFPs.
Iterating
v1:
.zip upload support
Field templates (e.g., pre-fill “name” and “email” for resumes)
Date formatting, better validation
v2:
Usage analytics (without storing docs)
Email capture → no sign up yet, but I you’d still need to give your e-mail address
Templates for RFPs and proposals
v3:
Auth system + Supabase-backed user DB
Credit management service
Payment flow & webhook integration
A cleaner, more secure pipeline
Every iteration made it more robust, less hacky, and closer to a real SaaS.
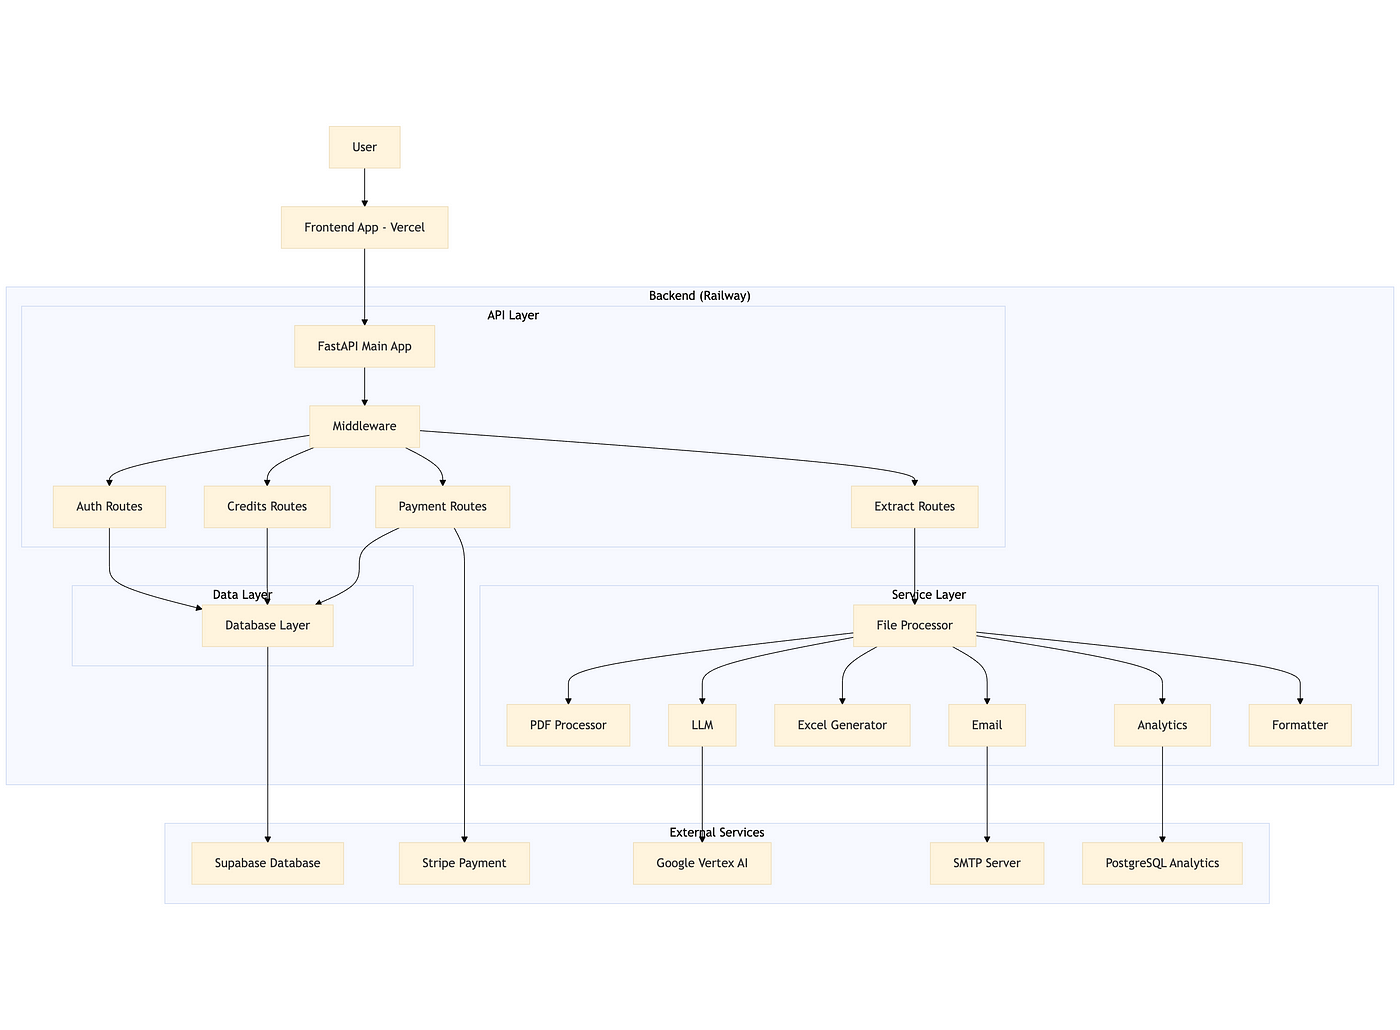
System Architecture (v3 overview)
ZapDoc consists of a Vercel-hosted frontend and a Railway-hosted FastAPI backend.
The core value proposition is simple: upload PDF documents, specify which fields you want to extract, and receive structured data in Excel format via email.
Overview of the system design
Technical Stack
Backend: FastAPI (Python) running on Railway
AI: Google Vertex AI (Gemini)
Database: Supabase (PostgreSQL)
Payments: Stripe
Frontend: React (Vercel)
Analytics: PostgreSQL
Core Implementation
1. FastAPI app
The backend is modular, with clear separation between API routes, services, and data models.
Middleware enforces CORS and HTTPS, and all routes are grouped by function (auth, extract, credits, payment).
2. Authentication & authorization
Authentication is handled via Supabase JWT tokens. The backend validates tokens on every request using a dependency-injected function, ensuring only authenticated users can access protected endpoints.
3. Document processing pipeline
Credit validation
Before processing, the system checks if the user has enough credits (1 credit per page). This is done atomically to prevent race conditions, using asyncio locks and optimistic locking at the database level.
Page counting
The backend counts the total number of pages across all uploaded PDFs and ZIPs (containing PDFs) using PyPDF.
PDF text extraction
Text is extracted from each PDF using PyPDF, with robust error handling for malformed or encrypted files.
AI-powered field extraction
The extracted text is sent to Google Vertex AI (or OpenAI as fallback) with a prompt to extract only the requested fields. The response is parsed and validated, using the json_repair library to handle malformed JSON.
Document classification
For analytics, the document is also classified (invoice, receipt, contract, etc.) using the same LLM service.
Excel generation
Extracted data is written to an Excel file using OpenPyXL, with the first row as headers and subsequent rows as data.
A header column is included, with the file names.
Email delivery
The resulting Excel file is sent to the user via SMTP, using a styled HTML template and proper attachment handling.
4. Atomic credit operations
All credit operations (add/spend) are atomic. The backend uses asyncio locks and checks the current credit balance before updating, retrying if a concurrent modification is detected.
5. Payment integration
Stripe is used for purchasing credits. The backend creates a checkout session and listens for webhook events to credit the user’s account after successful payment.
6. Analytics
The processed documents themselves are not stored, but the type (resume, etc.) and status (error / success) is logged to a PostgreSQL analytics database for monitoring and future insights.
Key technical challenges & solutions
By far, the most challenging part for me was setting up the whole thing in a way that it wouldn’t have major security flaws.
In short, when I set the credit/payment part, I wanted to make sure that users couldn’t bypass the payment system somehow, nor get other users’ email addresses.
Since this is the part I’m the least comfortable with, I had a lot of help from ChatGPT.
Things like path traversal protection, user isolation, CORS, middleware, etc. are still not 100% clear to me, but this project helped me get a better understanding of them.
Some other stuff to keep in mind
Race conditions: Solved with asyncio locks and optimistic DB updates.
LLM response robustness: Used json_repair and strict field validation.
PDF extraction reliability: PyPDF with error handling and support for ZIPs.
Performance: Async I/O, efficient batch processing, and proper resource cleanup.
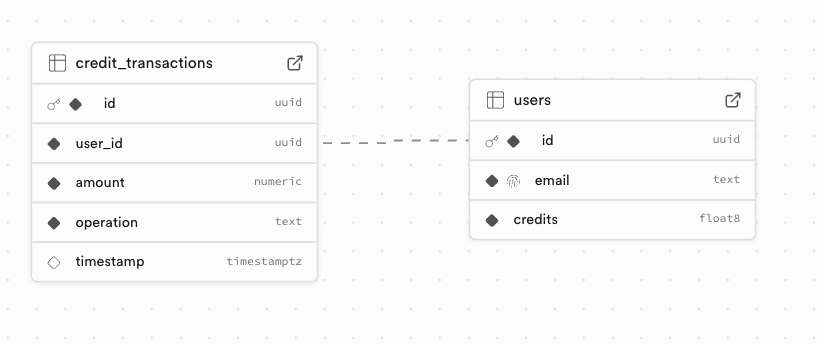
Database Schema (Supabase)
Branding, naming & launch
I wanted something simple, memorable, and descriptive.
After a few brainstorms, I landed on ZapDoc, because it zaps your documents into structured data.
The name stuck.
I described the project to ChatGPT and asked it to draw a logo.
Its first suggestion wasn’t amazing, but it was good enough, so I kept it:
Then came the social and launch planning: Medium, LinkedIn, X, Bluesky, Discord, Uneed, Product Hunt… I’m still rolling that out now.
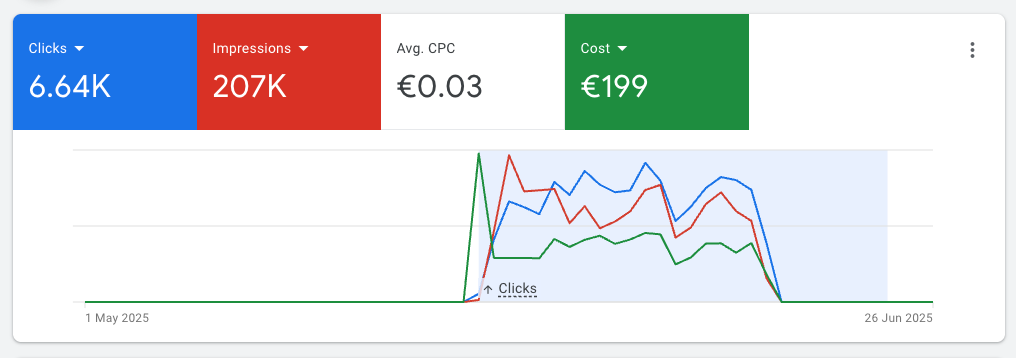
To get some validation for the product, I launched this free version and even ran some Google Ads campaigns for it (~200 euros over 3 weeks)
That brought a lot of people to the tool, but not many users:
Plus, I saw that once the ads stopped, traffic was basically over.
This indicates that people who tried it before didn’t really stick to it.
Either the tool is not useful, or I’m not reaching the right people.
What I learned (so far)
Start with a niche: you can’t beat GPT-4 at “generic doc parsing”, but you can win at “extract line items from French invoices”.
Atomicity matters: especially when money is involved.
AI output isn’t perfect: you need robust validation & formatting layers.
Building is much easier than selling: it became much easier to build powerfull tools with the help of AI. Making people pay for them is much harder than I expected.
To be honest, I’m still struggling with the niche part: from the usage stats, it seems that most people use it to parse CVs (I thought it would be contracts). But that’s still too generic, so I’ll try to narrow it down once I get more usage data.
What’s next
For v4 and beyond, I’ll try to run ads again (but put less money this time), to see if now people are willing to actually sign up and pay.
If that happens, then I’ll work on some more technical improvements. Some ideas I have in mind for this:
Move logs from Railway to Supabase for better observability
Expose an API, so people can integrate it into their own tools
Add more document types (contracts, tenders)
Allow users to store custom lists of fields
Final thoughts
ZapDoc is still small.
But it works, and it helped me learn a lot of useful stuff.
Now, I want to crack the sales part, so I can help real users automate real work.
If you’re building with LLMs, don’t chase the hype. Solve a boring problem really well.
Use Hugging Face’s smolagents framework to automate customer support for a fashion store
Introduction
Fashion retailers receive hundreds of customer emails every day.
Some asking about products, others trying to place orders. Manually handling these messages is time-consuming, error-prone, and doesn’t scale.
In this project, we tackle this problem by building an AI system that reads emails, classifies their intent, and automatically generates appropriate responses.
We will embed product data using OpenAI, and store the vectors in ChromaDB. It’s a good choice for fast retrieval and setup, keeping things local.
One very important feature here is metadata: we need to make sure this is properly set for enhanced search. For instance, ChromaDB doesn’t handle well filters on array fields, so we turn the “seasons” field into a set of boolean columns.
import chromadb from chromadb.config import Settings from chromadb.errors import NotFoundError
Now, to the juicy part: setting up our agent and it’s tool.
Since we needs to be able to query our product database, we create a function called query_product_db, which takes as input a query and filters.
For it to be a proper tool, our function needs the @tool decorator, a proper docstring, and type hints. This is what allows our agent to know exactly how to use.
In our case, we need our agent to know exactly how to use the metadata filters in ChromaDB, so setting up a few examples is a good idea:
from smolagents import OpenAIServerModel, ToolCallingAgent, tool from typing import List, Optional
@tool def query_product_db(query: str, metadata_filter:dict | None=None, document_filter:dict | None=None) -> dict: """Retrieve the three best-matching products from the `products` Chroma DB vectorstore.
Args: query : str Natural-language search term. A dense vector is generated with ``get_embedding`` and used for similarity search. metadata_filter : dict | None, optional A Chroma metadata filter expressed with Mongo-style operators (e.g. ``{"$and": [{"price": {"$lt": 25}}, {"fall": {"$eq": 1}}]}``). If *None*, no metadata constraints are applied. document_filter : dict | None, optional Full-text filter run on each document’s contents (e.g. ``{"$contains": "scarf"}``). If *None*, every document is eligible.
Examples -------- >>> get_product( ... "a winter accessory under 25 dollars, the id is FZZ1098", ... metadata_filter={ ... "$and": [ ... {"price": {"$lt": 25}}, ... {"category": {"$in": ["Accessories"]}}, ... {"winter": {"$eq": 1}}, {"product_id""{"$eq": "FZZ1098"}} ... ] ... }, ... document_filter={"$contains": "scarf"} ... )
Here's an overview of the product database metadata:
product_id,name,category,description,stock,spring,summer,fall,winter,price RSG8901,Retro Sunglasses,Accessories,"Transport yourself back in time with our retro sunglasses. These vintage-inspired shades offer a cool, nostalgic vibe while protecting your eyes from the sun's rays. Perfect for beach days or city strolls.",1,1,1,0,0,26.99 SWL2345,Sleek Wallet,Accessories,"Keep your essentials organized and secure with our sleek wallet. Featuring multiple card slots and a billfold compartment, this stylish wallet is both functional and fashionable. Perfect for everyday carry.",5,1,1,0,0,30 VSC6789,Versatile Scarf,Accessories,"Add a touch of versatility to your wardrobe with our versatile scarf. This lightweight, multi-purpose accessory can be worn as a scarf, shawl, or even a headwrap. Perfect for transitional seasons or travel.",6,1,0,1,0,23
Finally, we use ToolCallingAgent, which is suited for our use case.
In some other cases, you might want to use CodeAgent (for example, for writing code, obviously).
4. Email classification with LLM
Next step is to ese GPT to classify each email as either an “order request” or “product inquiry” and store results in an email-classification dataframe.
For this we don’t need the agent: a simple call to an LLM is enough:
from pydantic import BaseModel, Field from typing import Literal
class EmailClass(BaseModel): category: Literal["order_request", "customer_inquiry"] = Field(..., description="Email classification")
def classify_email(email): system_prompt = """You are a smart classifier trained to categorize customer emails based on their content. Each email includes a subject and a message body. There are two possible categories: • order_request: The customer is clearly expressing the intent to place an order, make a purchase, or asking to buy something (even if casually or imprecisely). • customer_inquiry: The customer is asking a question, requesting information, or needs help deciding before buying.
Classify the following emails based on their subject and message. Output only one of the two categories: order_request or customer_inquiry. Do not add any extra text, just the class.
⸻
Examples:
Email 1 Subject: Leather Wallets Message: Hi there, I want to order all the remaining LTH0976 Leather Bifold Wallets you have in stock. I’m opening up a small boutique shop and these would be perfect for my inventory. Thank you! Category: order_request
Email 2 Subject: Need your help Message: Hello, I need a new bag to carry my laptop and documents for work. My name is David and I’m having a hard time deciding which would be better - the LTH1098 Leather Backpack or the Leather Tote? Does one have more organizational pockets than the other? Category: customer_inquiry
Email 3 Subject: Purchase Retro Sunglasses Message: Hello, I would like to order 1 pair of RSG8901 Retro Sunglasses. Thanks! Category: order_request
Email 4 Subject: Inquiry on Cozy Shawl Details Message: Good day, For the CSH1098 Cozy Shawl, the description mentions it can be worn as a lightweight blanket. At $22, is the material good enough quality to use as a lap blanket? Category: customer_inquiry """
user_prompt = f""" Now classify this email: Subject: {email.subject} Message: {email.message} Category: """
Now that everything is set up, let’s handle our first use case: dealing with order requests.
These emails can be tricky they might mention a certain product by its name, ID, or something else. They might mention the quantity they want to buy, or things like “all you have in stock”.
For ex.:
Subject: Leather Wallets
Message: Hi there, I want to order all the remaining
LTH0976 Leather Bifold Wallets you have in stock.
I'm opening up a small boutique shop and these would be perfect
for my inventory. Thank you!
So, before we deal with it, we need to extract product requests from emails using structured LLM prompts. For instance, product id and requested quantity. Since quantity might be “all you have in stock”, our agent needs access to the product database to find that information.
Extract structured information
Let’s start extracting structured information from the email, using our agent:
def extract_order_request_info(order_request): prompt = f""" Given a customer email placing a product order, extract the relevant information from it: product and quantity. The customer might mention multiple products, but we only need those for which they are explictly placing an order.
answer should be in this format: [{{'product_id': <the product ID, in this format: 'VSC6789'>,'quantity': <an integer>}}] 'quantity' should always be an integer. If needed, check the quantity in stock. If the mentioned product ID does not follow that format (ex.: it contains spaces, '-', etc.), clean it to follow that format (3 letters, 4 numbers, no other characters)
Here are 2 examples of the expected output: Example 1: [{{'product_id': 'LTH0976', 'quantity': 4}}]
Example 2: [{{'product_id': 'SFT1098', 'quantity': 3}}, {{'product_id': 'ABC1234', 'quantity': 1}}]
╭──────────────────────────────────────────────────── New run ────────────────────────────────────────────────────╮
│                                                                                                                 │
│ Given a customer email placing a product order, extract the relevant information from it: product and quantity. │
│       The customer might mention multiple products, but we only need those for which they are explictly         │
│       placing an order.                                                                                         │
│                                                                                                                 │
│                                                                                                                 │
│       Subject: Leather Wallets                                                                                  │
│       Message: Hi there, I want to order all the remaining LTH0976 Leather Bifold Wallets you have in stock.    │
│ I'm opening up a small boutique shop and these would be perfect for my inventory. Thank you!                    │
│                                                                                                                 │
│       answer should be in this format:                                                                          │
│       [{'product_id': <the product ID, in this format: 'VSC6789'>,'quantity': <an integer>}\]                   │
│       'quantity' should always be an integer. If needed, check the quantity in stock.                           │
│       If the mentioned product ID does not follow that format (ex.: it contains spaces, '-', etc.),             │
│       clean it to follow that format (3 letters, 4 numbers, no other characters)                                │
│                                                                                                                 │
│                                                                                                                 │
│                                                                                                                 │
│       Here are 2 examples of the expected output:                                                               │
│       Example 1:                                                                                                │
│       [{'product_id': 'LTH0976', 'quantity': 4}\]                                                               │
│                                                                                                                 │
│       Example 2:                                                                                                │
│       [{'product_id': 'SFT1098', 'quantity': 3}, {'product_id': 'ABC1234', 'quantity': 1}\]                     │
│                                                                                                                 │
╰─ OpenAIServerModel - gpt-4o ────────────────────────────────────────────────────────────────────────────────────╯
━━━━━━━━━━━━━━━━━━━━━━━━━━━━━━━━━━━━━━━━━━━━━━━━━━━━━ Step 1 ━━━━━━━━━━━━━━━━━━━━━━━━━━━━━━━━━━━━━━━━━━━━━━━━━━━━━━
╭─────────────────────────────────────────────────────────────────────────────────────────────────────────────────╮
│ Calling tool: 'query_product_db' with arguments: {'query': 'LTH0976 Leather Bifold Wallet'}                     │
╰─────────────────────────────────────────────────────────────────────────────────────────────────────────────────╯
Observations: {'ids': ||'5', '1', '21']], 'embeddings': None, 'documents': ||'Leather Bifold Wallet Accessories
Upgrade your everyday carry with our leather bifold wallet. Crafted from premium, full-grain leather, this sleek
wallet features multiple card slots, a billfold compartment, and a timeless, minimalist design. A sophisticated
choice for any occasion. All seasons', 'Sleek Wallet Accessories Keep your essentials organized and secure with our
sleek wallet. Featuring multiple card slots and a billfold compartment, this stylish wallet is both functional and
fashionable. Perfect for everyday carry. All seasons', 'Leather Backpack Bags Upgrade your daily carry with our
leather backpack. Crafted from premium leather, this stylish backpack features multiple compartments, a padded
laptop sleeve, and adjustable straps for a comfortable fit. Perfect for work, travel, or everyday use. All
seasons']], 'uris': None, 'included': |'documents', 'metadatas', 'distances'], 'data': None, 'metadatas':
||{'fall': 1, 'winter': 1, 'summer': 1, 'stock': 4, 'price': 21.0, 'category': 'Accessories', 'spring': 1,
'product_id': 'LTH0976'}, {'fall': 1, 'spring': 1, 'winter': 1, 'price': 30.0, 'category': 'Accessories', 'stock':
5, 'summer': 1, 'product_id': 'SWL2345'}, {'fall': 1, 'summer': 1, 'price': 43.99, 'product_id': 'LTH1098',
'category': 'Bags', 'stock': 7, 'spring': 1, 'winter': 1}]], 'distances': ||0.7475106716156006, 1.036144733428955,
1.1911123991012573]]}
[Step 1: Duration 3.41 seconds| Input tokens: 1,710 | Output tokens: 23]
━━━━━━━━━━━━━━━━━━━━━━━━━━━━━━━━━━━━━━━━━━━━━━━━━━━━━ Step 2 ━━━━━━━━━━━━━━━━━━━━━━━━━━━━━━━━━━━━━━━━━━━━━━━━━━━━━━
╭─────────────────────────────────────────────────────────────────────────────────────────────────────────────────╮
│ Calling tool: 'final_answer' with arguments: {'answer': "[{'product_id': 'LTH0976', 'quantity': 4}]"}           │
╰─────────────────────────────────────────────────────────────────────────────────────────────────────────────────╯
We can see it using the query_product_db tool and reflecting on its output (for example, if the requested quantity is in stock).
Process order
With the structured order information in hands, we can process those orders:
for _, row in exploded_order_requests_df.iterrows(): email_id = row['email_id'] product_id = row['product_id'] quantity = row['quantity']
if product_id in products.index: available_stock = products.at[product_id, 'stock']
if available_stock >= quantity: status = 'created' products.at[product_id, 'stock'] -= quantity else: status = 'out of stock' else: status = 'out of stock'
And, finally, use an LLM to generate a human-like response: confirm or explain stock issues, suggest alternatives.
def write_order_request_response(message, order_status): system_prompt = f""" A customer has requested to place an order for a product. Write a response to them, stating if the order was created or not, and reinforcing the product and the quantity ordered. If it was out of stock, explain it to them.
Make the email tone professional, yet friendly. You should sound human so, if the customer mentions something in their email that's worth referring to, do it.
Do not add any other text, such as email subject or placeholders, just a clean email body. Here are 2 examples of the expected reply:
Example 1: 'Hi there, Thank you for reaching out and considering our LTH0976 Leather Bifold Wallets for your new boutique shop. We’re thrilled to hear about your exciting venture! Unfortunately, the LTH0976 Leather Bifold Wallets are currently out of stock. We sincerely apologize for any inconvenience this may cause. Please let us know if there’s anything else we can assist you with or if you’d like to explore alternative products that might suit your boutique. Best, Customer Support'
Example 2: 'Hi, Thank you for reaching out and sharing your love for tote bags! It sounds like you have quite the collection! I'm pleased to inform you that your order for the VBT2345 Vibrant Tote Bag has been successfully created. We have processed your request for 1 unit, and it will be on its way to you shortly. If you have any further questions or need assistance, feel free to reach out. Best, Customer Support'
"""
user_prompt = f""" Here's the original message: {message}
def answer_product_inquiry(inquiry): prompt = f""" Your task is to answer a customer inquiry about one or multiple products.
You should: 1. Find the product(s) the customer refers to. This might be a specific product, or a general type of product.
For example, they might ask about a specific product id, or just a winter coat.
You can query the product catalog to find relevant information. It's up to you to understand what's the best strategy to find that product information.
Be careful: the customer might mention other products that do not relate to their inquiry.
Your job is to understand precisely the type of request they are making, and only query the database for the specific inquiry. If they mention a specific product id or type, but are not asking about those directly, you shouldn't look them up. Just look up information that will answer their inquiry.
2. Once you have the product information, write a response email to the customer.
Make the email tone professional, yet friendly. You should sound human so, if the customer mentions something in their email that's worth referring to, do it.
Do not add any other text, such as email subject or placeholders, just a clean email body.
Always sign as 'Customer Support'
Here's an example of the expected reply:
'Hi David,
Thank you for reaching out!
Both the LTH1098 Leather Backpack and the Leather Tote are great choices for work, but here are a few key differences: - Organization: The Backpack has more built-in compartments, including a padded laptop sleeve and multiple compartments, which make it ideal for organizing documents and electronics. - The Tote also offers a spacious interior and multiple pockets, but it’s slightly more open and less structured inside—great for quick access, but with fewer separate sections.
If your priority is organization and carrying a laptop securely, the LTH1098 Backpack would be the better fit.
Please let us know if there’s anything else we can assist you with, or if you'd like to place an order. Best, Customer Support'
Here's the user's inquiry: Subject: {inquiry["subject"]} Message: {inquiry["message"]}
Most query expansion methods either dig through feedback from initial search results or rely on pre-defined thesauruses. Query2doc skips both.
Instead, it uses LLMs to generate short, relevant pseudo-documents and appends them to your query — no retraining, no architecture changes.
How It Works
Use few-shot prompting (4 examples) to generate a passage based on a query.
Combine the original query and the LLM-generated text:
For BM25: repeat the query 5 times, then add the pseudo-doc.
For dense retrievers: simple [query] [SEP] [pseudo-doc].
Why It Matters
+15% nDCG@10 boost for BM25 on TREC DL.
Also improves dense models like DPR, SimLM, and E5 — even without fine-tuning.
Works best with bigger models — GPT-4 outperforms smaller ones.
Crucially, the combo of original query + pseudo-doc works better than either alone.
Limitations
Latency: >2 seconds per query — too slow for real-time.
Cost: ~550k LLM calls = ~$5K.
LLMs can hallucinate. Still need validation layers for production.
Takeaway
Query2doc is dead simple but surprisingly effective. It’s a plug-and-play upgrade for search systems — ideal for boosting retrieval quality when training data is scarce.
Just don’t expect real-time speed or perfect factual accuracy.
import chromadb
import openai
import os

# Set your OpenAI API key
openai.api_key = os.getenv("OPENAI_API_KEY")

# Step 1: Few-shot prompt template
def generate_pseudo_document(query):
    prompt = f"""
      Write a passage that answers the given query.

      Query: what state is zip code 85282
      Passage: 85282 is a ZIP code located in Tempe, Arizona. It covers parts of the Phoenix metro area and is known for being home to Arizona State University.

      Query: when was pokemon green released
      Passage: Pokémon Green was released in Japan on February 27, 1996, alongside Pokémon Red. These games were the first in the Pokémon series.

      Query: {query}
      Passage:"""

    response = openai.ChatCompletion.create(
        model="gpt-3.5-turbo",
        messages=[{"role": "user", "content": prompt}],
        max_tokens=150,
        temperature=0.7,
    )

    return response.choices[0].message["content"].strip()

# Step 2: Initialize Chroma and add documents
client = chromadb.Client()
collection = client.create_collection("my_docs")

docs = [
    "Pokémon Green was released in Japan in 1996.",
    "Tempe, Arizona has ZIP code 85282.",
    "Randy Newman sings the Monk theme song.",
    "HRA is employer-funded; HSA is individually owned and tax-free."
]

collection.add(
    documents=docs,
    ids=[f"doc_{i}" for i in range(len(docs))]
)

# Step 3: Expand user query
user_query = "when was pokemon green released"
pseudo_doc = generate_pseudo_document(user_query)
expanded_query = f"{user_query} {pseudo_doc}"

# Step 4: Run ChromaDB search
results = collection.query(
    query_texts=[expanded_query],
    n_results=2
)
Retrieval-Augmented Generation (RAG) was supposed to fix everything. More accurate answers. Less hallucination. Instant access to domain-specific knowledge.
But in real-world deployments, the results often disappoint.
Answers feel off. Retrievals are irrelevant. Context seems lost. So what’s going wrong?
Let’s break down the core problems, and how to fix them.
1. Vector embeddings aren’t magic
RAG relies on vector embeddings to find semantically similar documents. But embeddings aren’t perfect.
They compress language into fixed-length vectors and, in that compression, nuance gets lost.
The issues:
Polysemy: One word, multiple meanings. Embeddings may pick the wrong sense.
Synonymy: Different words, same meaning — but often not close enough in vector space.
Dense mapping: Common terms dominate, drowning out contextually relevant ones.
Lossy compression: Some information simply disappears during vectorization.
Fragmented meaning: Chunking documents too finely can split up important context.
Bottom line: vector similarity ≠ true relevance.
2. Your query might be the problem
If your query is too vague, you’ll get shallow matches.
Too specific? You risk missing relevant documents that use slightly different phrasing.
Fix it with:
Query rephrasing: Reformulate user queries before embedding them, to better align with how data is structured.
Disambiguation: Make sure the model understands what you actually mean (replacing acronyms, etc.)
Context tuning: Keep queries focused and information-rich — not bloated or ambiguous.
Your retrieval is only as smart as your query.
3. Your chunking strategy is hurting you
Chunking is more than just splitting text. It’s a balancing act.
Too small, and you lose context. Too large, and you overload the model.
Strategies to explore:
Sliding window: Maintains continuity across chunks.
Recursive chunking: Uses document structure (headings, paragraphs) to guide splits.
Semantic chunking: Groups based on meaning, not just tokens.
Hybrid chunking: Combines multiple methods, customized per use case.
The right chunking strategy depends on your data and your goals.
4. You’re missing Named Entity Filtering (NEF)
Named Entity Recognition (NER) isn’t just for tagging people and places.
It can drastically sharpen your retrievals by filtering documents based on entity-level relevance.
Use it to:
Filter results to only include documents with relevant entities.
Refine embeddings by focusing on entity-rich sentences.
Reduce noise and boost relevance, especially for technical or domain-specific content.
Pair this with noun-phrase disambiguation, and you’ll see a big drop in hallucinations.
5. You’re using embeddings too early
Embeddings are great, but don’t make them do all the work upfront.
Sometimes, traditional keyword matching or metadata filtering gives a cleaner first pass. Use vector embeddings to rerank or refine after that.
Think hybrid:
Start with keyword or synonym-based retrieval.
Apply vector search as a second pass.
Fine-tune embeddings for your domain for even better alignment.
Precision + semantic recall = better results.
6. You’re not using advanced RAG techniques
RAG has evolved. Basic setups won’t cut it anymore.
Try these:
Reranking: Cross-encoders to reassess document relevance.
Query expansion: Add synonyms, related terms, or constraints.
Prompt compression: Strip irrelevant content before feeding it to the model.
Corrective RAG (CRAG): Evaluate and refine retrieved documents dynamically.
RAG Fusion: Generate multiple queries and fuse their results for broader coverage.
Contextual Metadata Filtering RAG (CMF-RAG): Automatically generate metadata filters from the user query.
Enrich documents with context: When chunking, add a summary of the page or document, for context.
Use what fits your data and needs. There’s no one-size-fits-all.
Putting it all together
How do you know what will work for your use case?
Set up automated tests:
Define a batch of 50–100 relevant questions
Use an LLM as evaluator
Iterate through different chunking strategies, hyperparameters, type of search, etc. and store results
Analyze results and choose the best setup
Final thoughts
RAG isn’t broke, it’s just misunderstood.
It’s easy to slap vector search on top of an LLM and call it a day.
But building a high-performance RAG system takes more.
Tune your queries.
Chunk your documents wisely.
Filter with entities.
Rerank with smarter models.
Layer retrieval techniques strategically.
In short: stop treating retrieval as an afterthought.
It’s half the battle.
And often the one you’re losing.
Feel free to reach out to me if you would like to discuss further, it would be a pleasure (honestly):
Google recently dropped a prompt engineering whitepaper packed with practical techniques for getting better results out of language models.
If you’ve ever felt like your AI responses were a little off, this cheat sheet might be what you need.
Prompting techniques
Start simple. For straightforward tasks, zero-shot prompting (no examples, just direct questions) often works wonders.
Need structure or style? One-shot or few-shot prompting guides your AI by providing clear examples to follow. This gives the model context without overwhelming it.
Want precision? System prompting clearly defines your expectations and output format, like JSON. No guesswork needed.
Looking to add personality? Role prompting assigns a voice or tone — “Act as a coach,” or “be playful.” It transforms generic outputs into engaging conversations.
Got a complex situation? Contextual prompting gives background and constraints. It steers the AI exactly where you need it to go.
Feeling stuck? Step-back prompting helps the AI take a broader view before narrowing down to specifics, improving clarity and creativity.
Facing intricate logic or math? Chain of Thought (CoT) prompts the AI to reason step-by-step, making complex tasks manageable.
Want accuracy? Use self-consistency — run multiple CoT iterations and select the most common answer. More tries, fewer errors.
Need diverse reasoning paths? Tree of Thoughts (ToT) explores multiple routes simultaneously, ideal for tough, open-ended problems.
Best practices
Always provide examples — this alone can drastically improve results.
Keep prompts simple, clear, and structured. Complexity is your enemy.
Specify your desired output explicitly, format and style included.
Fine-tuning is the process of taking a pre-trained model and adjusting it on a specific dataset to specialize it for a particular task.
Instead of training a model from scratch (which is costly and time-consuming), you leverage the general knowledge the model already has and teach it your domain-specific patterns.
It’s like giving a well-read intern a crash course in your company’s workflow — faster, cheaper, and surprisingly effective.
LoRA (Low-Rank Adaptation) is a clever trick that makes fine-tuning large models much more efficient.
Instead of updating the entire model (millions or billions of parameters), LoRA inserts a few small trainable matrices into the model and only updates those during training.
Think of it like attaching a lightweight lens to a heavy camera — you adjust the lens, not the whole system, to get the shot you want.
Under the hood, LoRA works by decomposing weight updates into two smaller matrices with a much lower rank (hence the name).
This dramatically reduces the number of parameters you need to train — without sacrificing performance.
It’s a powerful way to customize large models on modest hardware, and it’s part of why AI is becoming more accessible beyond big tech labs.
The dataset
For this tutorial, I’ve decided to use Paul Graham’s blog to build a dataset with his essays.
I really like his style of writing, and thought it’d be cool to have a fine-tuned model that mimics it.
To build the dataset, I scraped his blog, then reverse-engineered the prompts that could have been used to write his essays.
This means I gave each of his essays to ChatGPT and asked what prompt could have been used to generate it.
This resulted in a dataset containing a prompt and an essay, which we’ll use to fine-tune our model.
bitsandbytes: efficient 8-bit optimizers for reducing memory usage during training
peft: lightweight fine-tuning methods like LoRA for large language models
trl: tools for training LLMs with reinforcement learning (e.g. PPO, DPO)
tensorboardX: TensorBoard support for PyTorch logging and visualization
wandb: experiment tracking and model monitoring with Weights & Biases
Next, let’s preprocess our data:
from enum import Enum from functools import partial import pandas as pd import torch import json
from transformers import AutoModelForCausalLM, AutoTokenizer, set_seed from datasets import load_dataset from trl import SFTConfig, SFTTrainer from peft import LoraConfig, TaskType import os
seed = 42 set_seed(seed)
# Put your HF Token here os.environ['HF_TOKEN']="<your HF token here>" # the token should have write access
Here, we set up the environment for fine-tuning a chat-style language model using LoRA and Google’s Gemma model.
We then format the answers to have a “text” field, containing both the prompts and the responses.
The result is a train/test split of the dataset, ready for supervised fine-tuning.
Now, we define our tokenizer:
model = AutoModelForCausalLM.from_pretrained(model_name,
                                             attn_implementation='eager',
                                             device_map="auto")
model.config.use_cache = False
model.to(torch.bfloat16)
Here, we:
Load the model with attn_implementation='eager', which uses a more compatible (though sometimes slower) attention mechanism useful for certain hardware or debugging.
Map the model to available devices (device_map="auto"), which automatically spreads the model across CPUs/GPUs as needed based on memory availability.
Cast the model to bfloat16, a memory-efficient format that speeds up training/inference on supported hardware (like recent NVIDIA/TPU chips).
r: rank dimension for LoRA update matrices (smaller = more compression)
lora_alpha: scaling factor for LoRA layers (higher = stronger adaptation)
lora_dropout: dropout probability for LoRA layers (helps prevent overfitting)
target_modules : which layers we target. You don’t need to specify those individually, you can just set it to “all_linear”. However, it can be a good exercise to experiment with different layers (to check all the available layers, run print(model))
Next, we set up our training arguments:
username = "arthurmello" # replace with your Hugging Face username output_dir = "gemma-3-1b-it-paul-graham" per_device_train_batch_size = 1 per_device_eval_batch_size = 1 gradient_accumulation_steps = 4 learning_rate = 1e-4
per_device_train_batch_sizeandper_device_eval_batch_size set how many samples are processed per device at each step for training and evaluation, respectively.
gradient_accumulation_steps allows effective batch sizes larger than memory limits by accumulating gradients over multiple steps.
learning_rate sets the starting learning rate for model optimization.
num_train_epochs defines how many times the model will see the full training dataset.
warmup_ratio gradually increases the learning rate during the first part of training to help stabilize early learning.
lr_scheduler_type="cosine" uses a cosine decay schedule to adjust the learning rate over time.
max_seq_length defines the maximum number of tokens per training sequence.
Traditional language models (LLMs) process text one word at a time.
They predict the next token based on the ones before it.
That works well, but it’s not how humans think.
When we write or speak, we don’t just string words together.
We organize our thoughts into sentences, ideas, and concepts.
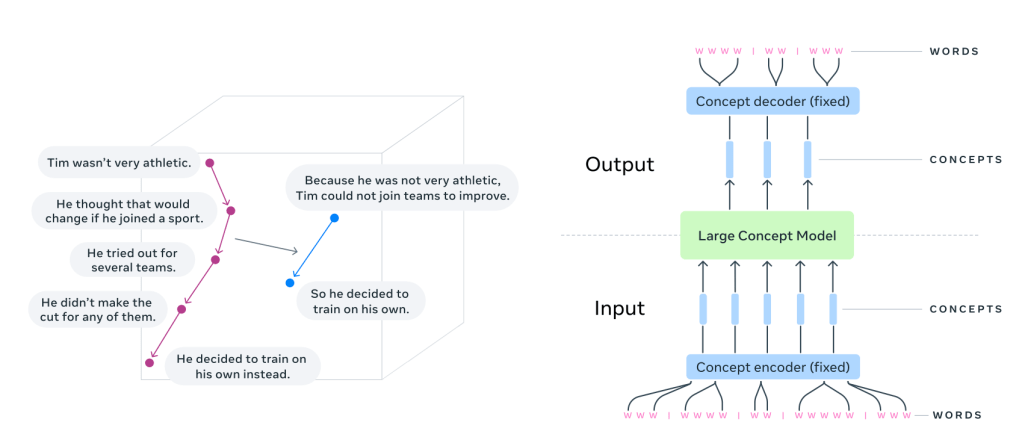
That’s where Large Concept Models (LCMs) come in.
Instead of predicting the next word, LCMs predict the next sentence.
Each sentence is treated as a concept — a standalone unit of meaning.
That’s a big shift.
Why does this matter?
LLMs operate at the token level, making them great at text generation but limited in their ability to reason hierarchically. They tend to get lost in long-form content, struggle with consistency, and often fail to keep track of structured ideas.
LCMs take a different approach. They generate text in sentence embeddings, operating in a high-dimensional space (like SONAR) instead of token sequences. Instead of focusing on words, they predict thoughts in a way that’s language- and modality-agnostic.
This has big implications:
Better context understanding — By modeling entire sentences as units, LCMs improve coherence and logical flow.
Multilingual and multimodal — Trained on 200+ languages, LCMs can generalize across text and speech without additional fine-tuning.
More efficient generation — Since they work at a higher level, they process fewer steps, making them faster and more scalable than token-based models.
Stronger zero-shot performance — LCMs outperform LLMs of the same size in summarization and text expansion tasks, even in languages they weren’t explicitly trained on.
The technical shift
LLMs generate text autoregressively, predicting one token at a time. This requires them to process long token sequences and maintain coherence through implicit context modeling.
LCMs, on the other hand, predict the next sentence embedding in a latent space.
Instead of raw tokens, they work with sentence representations from SONAR, a multilingual embedding model.
SONAR is trained to encode and decode sentences across 200+ languages into and out of a single shared representation space. When an LCM needs to handle a new language or modality, only the SONAR encoder/decoder must be updated — leaving the central model untouched.
The embeddings are processed autoregressively using diffusion models, MSE regression, or quantized representations — allowing LCMs to generalize across languages and modalities without needing explicit tokenization.
This shift reduces computational complexity, makes it easier to edit long-form text, and allows AI to reason at a higher level of abstraction.
The results
When tested on summarization and summary expansion, LCMs outperformed traditional LLMs of the same size.
They showed strong generalization across multiple languages — without additional fine-tuning.
They handled long-form text more coherently than token-based models.
And because they work in a modular embedding space, they can be extended to new languages, speech, or even sign language, without retraining the entire model.
Challenges
Sentence splitting
LCMs rely on robust sentence segmentation. Very long or tricky “sentences” can hurt performance.
Out-of-distribution embeddings
With MSE or diffusion, the model could predict vectors that don’t perfectly map back to valid text. Diffusion or well-tuned quantization helps mitigate this.
Averaging vs. sampling
A purely MSE-based approach might average all potential continuations into a single “blurry” embedding. Diffusion or discrete codebooks allow multiple plausible completions.
The Future of Language Modeling?
LLMs work. But they are word-by-word prediction machines.
LCMs take a different path — one that focuses on thoughts, not just tokens.
By modeling language at the concept level, they bring AI closer to how humans structure ideas.
This isn’t just an optimization. It’s a fundamental shift in how AI understands and generates language.
And it might just change how we build the next generation of intelligent systems.
Memory, reasoning, and the future of intelligent systems
AI is shifting from passive assistants to active problem solvers. Instead of just generating text based on a prompt, AI agents retrieve live information, use external tools, and execute actions.
Think of the difference between a search engine and a research assistant. One provides a list of links. The other finds, summarizes, and cross-checks relevant sources before presenting a well-formed answer. That’s what AI agents do.
Let’s break down how they work, why they matter, and how you can build one yourself.
Why AI Agents?
Traditional GenAI applications can generate convincing answers but lack:
Tools: They can’t fetch real-time data or perform actions.
Reasoning structure: They sometimes jump to conclusions without checking their work.
AI agents solve these issues by integrating tool usage, and structured reasoning.
Take a financial analyst, for example. Instead of manually searching for Apple’s stock performance, reading reports, and comparing it to recent IPOs, she could use an agent to:
1. Retrieve live stock data from an API.
2. Pull market news from a financial database.
3. Run calculations on trends and generate a summary.
No wasted clicks. No sifting through search results. Just a concise, actionable report.
How AI Agents Work
AI agents combine three essential components:
1. The model (Language understanding & reasoning)
This is the core AI system, typically based on an LLM like GPT-4, Gemini, or Llama. It handles natural language understanding, reasoning, and decision-making.
2. Tools (external data & action execution)
Unlike standalone models, agents don’t rely solely on their training data.
They use APIs, databases, and function calls to retrieve real-time information or perform actions.
Common tools include:
Search engines for fetching up-to-date information.
Financial APIs for stock prices, economic reports, or currency exchange rates.
Weather APIs for real-time forecasts.
Company databases for business insights.
3. The Orchestration Layer (Planning & Execution)
This is what makes an agent more than just a chatbot. The orchestration layer manages:
Memory: Keeping track of previous interactions.
Decision-making: Deciding when to retrieve information vs. generating a response.
Multi-step execution: Breaking down complex tasks into logical steps.
It ensures that the agent follows structured reasoning instead of blindly generating an answer.
Thinking Before Acting: The ReAct Approach
One of the biggest improvements in AI agent design is ReAct (Reason + Act). Instead of immediately answering a question, the agent first:
1. Thinks through the problem, breaking it into smaller steps.
2. Calls a tool (if needed) to gather relevant information.
3. Refines its answer based on the retrieved data.
Without this structure, models can confidently hallucinate — generating incorrect information with complete certainty.
ReAct reduces that risk by enforcing a step-by-step thought process.
Example
Without ReAct:
Q: What’s the tallest building in Paris?
A: The Eiffel Tower.
(Sounds reasonable, but wrong. The Montparnasse Tower is taller if you exclude antennas.)
With ReAct:
Q: What’s the tallest building in Paris?
Agent:
1. “First, let me check the list of tall buildings in Paris.” (Calls search tool)
2. “The tallest building is Tour Montparnasse at 210 meters.” (Provides correct answer)
This approach ensures accuracy by retrieving data when necessary rather than relying on training data alone.
AI Agents in Action: Real-World Examples
Let’s explore some concrete applications with the smolagents framework, by HuggingFace.
from smolagents import CodeAgent, DuckDuckGoSearchTool, HfApiModel

model = HfApiModel()
agent = CodeAgent(tools=[DuckDuckGoSearchTool()], model=model)

query = "Compare Apple's stock performance this week to major tech IPOs."
response = agent.run(query)
print(response)
What happens here?
1. The agent searches for stock performance data using DuckDuckGo’s API.
2. It retrieves relevant comparisons between Apple and newly public companies.
3. If needed, it could summarize key financial trends.
Instead of giving a vague answer like “Apple’s stock is up”, the agent provides a structured comparison, making it more useful.
This example uses an existing search tool, but the smolagents framework allows you to build your own: it could be calling an API or writing in a database, sending an email.
Any Python function, really.
The Future of AI Agents
AI agents are shifting how we interact with AI.
Instead of just responding to prompts, they make decisions based on logic, and call external tools.
Where Are We Headed?
1. Multi-Agent Systems — Teams of specialized AI agents working together.
2. Self-Improving Agents — Agents that refine their own strategies based on past interactions.
3. Embedded AI — Assistants woven into workflows that anticipate problems before they arise.
AI isn’t just answering questions anymore — it’s solving problems.
Final Thoughts
The difference between an AI model and an AI agent is the difference between knowing and doing.
A model like ChatGPT is an information engine. It predicts words based on patterns.
An agent is an action engine. It retrieves data, runs calculations, and executes tasks.
This shift — from static responses to dynamic, tool-enabled intelligence — is where AI is headed.
The real challenge now isn’t just improving models, but designing intelligent, adaptive systems that can reason, act, and learn over time.
AI agents will augment human decision-making, making us faster, more informed, and better equipped to navigate an increasingly complex world.