
Fine-tuning is the process of taking a pre-trained model and adjusting it on a specific dataset to specialize it for a particular task.
Instead of training a model from scratch (which is costly and time-consuming), you leverage the general knowledge the model already has and teach it your domain-specific patterns.
It’s like giving a well-read intern a crash course in your company’s workflow — faster, cheaper, and surprisingly effective.
LoRA (Low-Rank Adaptation) is a clever trick that makes fine-tuning large models much more efficient.
Instead of updating the entire model (millions or billions of parameters), LoRA inserts a few small trainable matrices into the model and only updates those during training.
Think of it like attaching a lightweight lens to a heavy camera — you adjust the lens, not the whole system, to get the shot you want.
Under the hood, LoRA works by decomposing weight updates into two smaller matrices with a much lower rank (hence the name).
This dramatically reduces the number of parameters you need to train — without sacrificing performance.
It’s a powerful way to customize large models on modest hardware, and it’s part of why AI is becoming more accessible beyond big tech labs.
The dataset
For this tutorial, I’ve decided to use Paul Graham’s blog to build a dataset with his essays.
I really like his style of writing, and thought it’d be cool to have a fine-tuned model that mimics it.
To build the dataset, I scraped his blog, then reverse-engineered the prompts that could have been used to write his essays.
This means I gave each of his essays to ChatGPT and asked what prompt could have been used to generate it.
This resulted in a dataset containing a prompt and an essay, which we’ll use to fine-tune our model.
Now, let’s build!
Tutorial
Start by installing stuff:
!pip install bitsandbytes
!pip install peft
!pip install trl
!pip install tensorboardX
!pip install wandbbitsandbytes: efficient 8-bit optimizers for reducing memory usage during trainingpeft: lightweight fine-tuning methods like LoRA for large language modelstrl: tools for training LLMs with reinforcement learning (e.g. PPO, DPO)tensorboardX: TensorBoard support for PyTorch logging and visualizationwandb: experiment tracking and model monitoring with Weights & Biases
Next, let’s preprocess our data:
from enum import Enum
from functools import partial
import pandas as pd
import torch
import json

from transformers import AutoModelForCausalLM, AutoTokenizer, set_seed
from datasets import load_dataset
from trl import SFTConfig, SFTTrainer
from peft import LoraConfig, TaskType
import os

seed = 42
set_seed(seed)

# Put your HF Token here
os.environ['HF_TOKEN']="<your HF token here>" # the token should have write access

model_name = "google/gemma-3-1b-it"
dataset_name = "arthurmello/paul-graham-essays"
tokenizer = AutoTokenizer.from_pretrained(model_name)

tokenizer.chat_template = "{{ bos_token }}{% if messages[0]['role'] == 'system' %}{{ raise_exception('System role not supported') }}{% endif %}{% for message in messages %}{{ '<start_of_turn>' + message['role'] + '\n' + message['content'] | trim + '<end_of_turn><eos>\n' }}{% endfor %}{% if add_generation_prompt %}{{'<start_of_turn>model\n'}}{% endif %}"
def preprocess(sample):
    prompt = sample["prompt"]
    response = sample["response"]

    messages = [
        {"role": "user", "content": prompt},
        {"role": "assistant", "content": response}
    ]

    return {"text": tokenizer.apply_chat_template(messages, tokenize=False)}

dataset = load_dataset(dataset_name)
dataset = dataset.map(preprocess, remove_columns=["prompt", "response"])
dataset = dataset["train"].train_test_split(0.1)
Here, we set up the environment for fine-tuning a chat-style language model using LoRA and Google’s Gemma model.
We then format the answers to have a “text” field, containing both the prompts and the responses.
The result is a train/test split of the dataset, ready for supervised fine-tuning.
Now, we define our tokenizer:
model = AutoModelForCausalLM.from_pretrained(model_name,
                                             attn_implementation='eager',
                                             device_map="auto")
model.config.use_cache = False
model.to(torch.bfloat16)
Here, we:
- Load the model with
attn_implementation='eager', which uses a more compatible (though sometimes slower) attention mechanism useful for certain hardware or debugging. - Map the model to available devices (
device_map="auto"), which automatically spreads the model across CPUs/GPUs as needed based on memory availability. - Cast the model to
bfloat16, a memory-efficient format that speeds up training/inference on supported hardware (like recent NVIDIA/TPU chips).
Next, we set up our LoRA parameters:
rank_dimension = 16
lora_alpha = 64
lora_dropout = 0.1

peft_config = LoraConfig(r=rank_dimension,
                         lora_alpha=lora_alpha,
                         lora_dropout=lora_dropout,
                         target_modules=[
                             "q_proj", "k_proj", "v_proj",
                             "o_proj", "gate_proj", "up_proj",
                             "down_proj"
                             ],
task_type=TaskType.CAUSAL_LM)r: rank dimension for LoRA update matrices (smaller = more compression)lora_alpha: scaling factor for LoRA layers (higher = stronger adaptation)lora_dropout: dropout probability for LoRA layers (helps prevent overfitting)target_modules: which layers we target. You don’t need to specify those individually, you can just set it to “all_linear”. However, it can be a good exercise to experiment with different layers (to check all the available layers, runprint(model))
Next, we set up our training arguments:
username = "arthurmello" # replace with your Hugging Face username
output_dir = "gemma-3-1b-it-paul-graham"
per_device_train_batch_size = 1
per_device_eval_batch_size = 1
gradient_accumulation_steps = 4
learning_rate = 1e-4

num_train_epochs=10
warmup_ratio = 0.1
lr_scheduler_type = "cosine"
max_seq_length = 1500

training_arguments = SFTConfig(
    output_dir=output_dir,
    per_device_train_batch_size=per_device_train_batch_size,
    per_device_eval_batch_size=per_device_eval_batch_size,
    gradient_accumulation_steps=gradient_accumulation_steps,
    save_strategy="no",
    eval_strategy="epoch",
    logging_steps=logging_steps,
    learning_rate=learning_rate,
    max_grad_norm=max_grad_norm,
    weight_decay=0.1,
    warmup_ratio=warmup_ratio,
    lr_scheduler_type=lr_scheduler_type,
    report_to="tensorboard",
    bf16=True,
    hub_private_repo=False,
    push_to_hub=True,
    num_train_epochs=num_train_epochs,
    gradient_checkpointing=True,
    gradient_checkpointing_kwargs={"use_reentrant": False},
    packing=False,
    max_seq_length=max_seq_length,
)
Here, we set:
per_device_train_batch_sizeandper_device_eval_batch_sizeset how many samples are processed per device at each step for training and evaluation, respectively.gradient_accumulation_stepsallows effective batch sizes larger than memory limits by accumulating gradients over multiple steps.learning_ratesets the starting learning rate for model optimization.num_train_epochsdefines how many times the model will see the full training dataset.warmup_ratiogradually increases the learning rate during the first part of training to help stabilize early learning.lr_scheduler_type="cosine"uses a cosine decay schedule to adjust the learning rate over time.max_seq_lengthdefines the maximum number of tokens per training sequence.
Finally, we train our model:
trainer = SFTTrainer(
    model=model,
    args=training_arguments,
    train_dataset=dataset["train"],
    eval_dataset=dataset["test"],
    processing_class=tokenizer,
    peft_config=peft_config,
)

trainer.train()
Here, you should see something that looks like this:
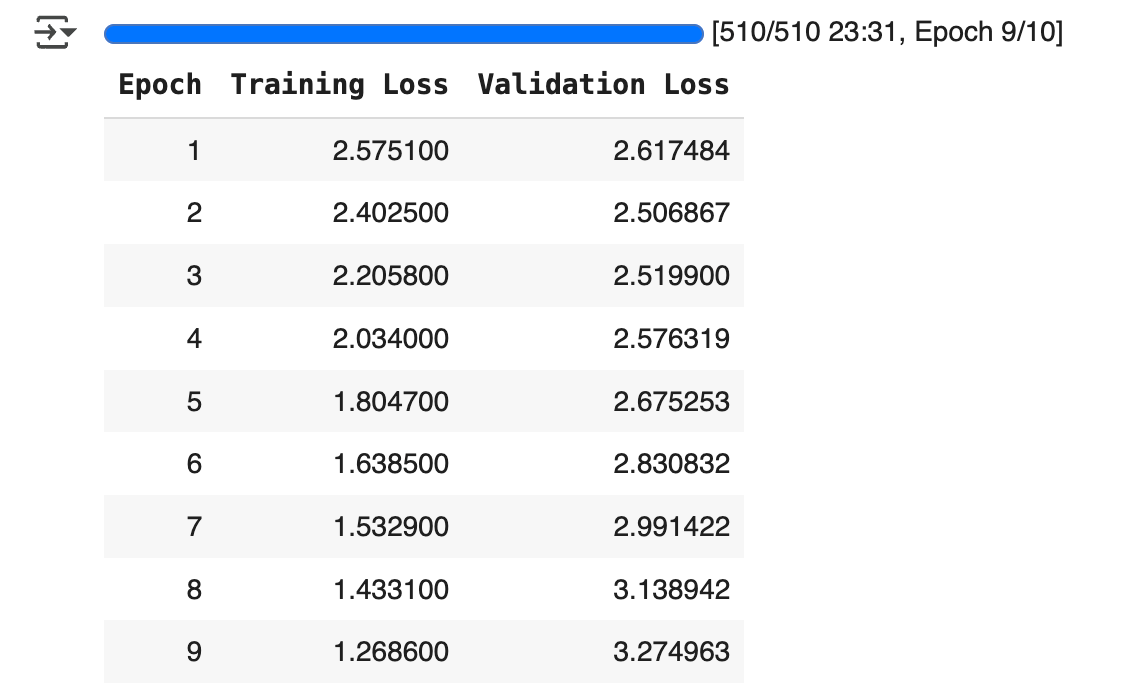
This shows the training and validation loss for each epoch.
If training loss decreases and validation loss increases, this indicates overfitting (which we can see here around epoch 3).
Some strategies to adress overfitting include:
- reducing
learning_rate - increasing
lora_dropout - reducing
num_train_epochs
Once you’re satisfied with the training results, you can compare your model’s output with the base model’s:
base_model = AutoModelForCausalLM.from_pretrained(model_name).to(torch.bfloat16)
base_tokenizer = AutoTokenizer.from_pretrained(model_name)

fine_tuned_model = model
fine_tuned_tokenizer = tokenizer

# Example input prompt
prompt = "<start_of_turn>user\Write an essay on the future of AI<end_of_turn><eos>\n<start_of_turn>model\n"

# Inference helper
def generate(model, tokenizer, prompt):
    device=model.device
    inputs = tokenizer(prompt, return_tensors="pt").to(device)
    output = model.generate(**inputs)
    return tokenizer.decode(output[0], skip_special_tokens=True)

print("=== Base Model Output ===")
print(generate(base_model, base_tokenizer, prompt))

print("\n=== Fine-Tuned Model Output ===")
print(generate(fine_tuned_model, fine_tuned_tokenizer, prompt))
There you go, now you have your own fine-tuned model to replicate Paul Graham’s style!
If you set push_to_hub=True in SFTConfig , you can call your fine-tuned model anytime, using your own username and output_id :
model = AutoModelForCausalLM.from_pretrained(
         "arthurmello/gemma-3-1b-it-paul-graham")
And, of course, you can adapt this approach to fine-tune LLMs for other use cases!
A video version of this tutorial is available here:
Feel free to reach out to me if you would like to discuss further, it would be a pleasure (honestly):

Leave a comment